
Key Takeaways
- Dust leaks after new bag installation are often caused by poor snap band seating, worn tubesheet holes, incorrect cage fit, installation damage, gasket leakage, or bypass paths, not only by filter bag media quality.
- Dust collector filter bags must match the baghouse tubesheet, cage, top style, bottom design, operating temperature, dust properties, and cleaning method.
- Filter bag cages should be checked before installing new bags because bent, rough, corroded, or wrong-size cages can damage the filter bag or disturb sealing.
- Omela’s installation guidance emphasizes tubesheet inspection, snap band seating, cage alignment, gasket condition, and post-installation fluorescent powder leak testing before returning the baghouse to service.
- Baghouse fluorescent tracer powder helps identify leakage around bag collars, tubesheet bypass, failed bags, and hidden leakage paths that visual inspection may miss.
- For replacement review, send bag size, snap band type, tubesheet hole diameter, cage diameter and length, cage photos, failed bag photos, leak test results, dust type, temperature, and quantity to contact Omela Filtration.
Why New Filter Bags Can Still Leak
When a baghouse still leaks after filter bag replacement, many maintenance teams first think the new bags are defective. In some cases, bag quality should be checked. But in many real installations, the leak comes from fit, sealing, installation, cage condition, or structural bypass.
A baghouse can only work properly when dusty air is forced through the filter media. If air can pass around the bag collar, through a worn tubesheet hole, through a poor gasket, or through a bag scratched during cage insertion, dust will still reach the clean-air side.
EPA explains that fabric filters use fabric elements to collect particulate matter, and that bag leak detection systems can be used to monitor bag breakage and leakage. EPA also identifies outlet particulate concentration, opacity, pressure differential, inlet temperature, cleaning operation, and fan current as important performance indicators for fabric filters.
That is why filter bag replacement should not be treated as a simple “remove and replace” job. It should be treated as a sealing, alignment, and verification process.
The Main Leak Paths After Bag Changeout
After a bag changeout, dust leakage usually comes from a few common places. Some are easy to see, but others require closer inspection or fluorescent powder testing.
| Leak Path | What Usually Happens | What to Check |
|---|---|---|
| Snap band not fully seated | Dust bypasses around the bag collar | Snap band groove, collar shape, seating position, top-side dust marks |
| Worn or deformed tubesheet hole | The new bag cannot seal evenly | Hole diameter, ovality, corrosion, pitting, sharp edges |
| Wrong cage fit | The bag is stretched, folded, rubbed, or poorly supported | Cage diameter, cage length, wire condition, venturi alignment |
| Installation damage | The bag is scratched, punctured, folded, or torn during handling | Cage bottom, rough welds, sharp edges, dragged bags |
| Gasket or structural bypass | Dust passes through doors, joints, welds, or compartment gaps | Access-door gaskets, weld seams, flanges, hopper joints |
| No leak test after installation | Small bypass paths remain unnoticed | Fluorescent powder test, UV inspection, clean-air plenum check |
Omela’s installation article points out that once old bags and cages are removed, the tubesheet becomes accessible and should be inspected for corrosion, warping, or damage at the snap band seat. It also notes that degraded gaskets can create leakage paths that are not caused by any individual filter bag.
Snap Band Seating: The First Place to Check
For top-load snap band filter bags, the snap band must expand correctly into the tubesheet opening and create a tight seal. If the snap band is only partly seated, dusty air can bypass the bag at the top.
This problem can happen when the tubesheet hole is dirty, corroded, oversized, oval, or damaged. It can also happen when the snap band size is wrong, the bag collar is twisted, or the installer does not confirm the seating condition before inserting the cage.
A poor snap band seal may look minor during installation. But once the fan starts, the pressure difference can pull dusty air through the gap. The result may be dust around the bag collar, visible outlet dust, clean-air plenum contamination, or unstable emissions.
For replacement projects, Omela recommends checking the bag top style, tubesheet hole diameter, snap band construction, and installation fit together instead of only copying the old bag length.
Tubesheet Hole Fit: A Good Bag Cannot Seal a Bad Hole
The tubesheet is the sealing foundation of the baghouse. Even a correct filter bag cannot seal well if the tubesheet opening is worn, oval, corroded, or damaged.
Common tubesheet problems include corrosion, pitting, sharp edges, dust buildup in the snap band groove, poor welding, and deformation around the hole. These problems are more common in systems with moisture, acid gas, high temperature fluctuation, or long service history.
Omela’s measurement article gives a practical warning: if the tube sheet hole is worn or oval, a snap band size that looks correct on paper may still leak. It also notes that filter bag and cage dimensions affect seal integrity, pulse cleaning efficiency, bag wear, and emissions stability.
This is why normal pressure drop does not always mean the baghouse is sealed. A bypass leak may allow dust to escape while differential pressure still appears acceptable.
Cage Alignment and Bag-to-Cage Fit
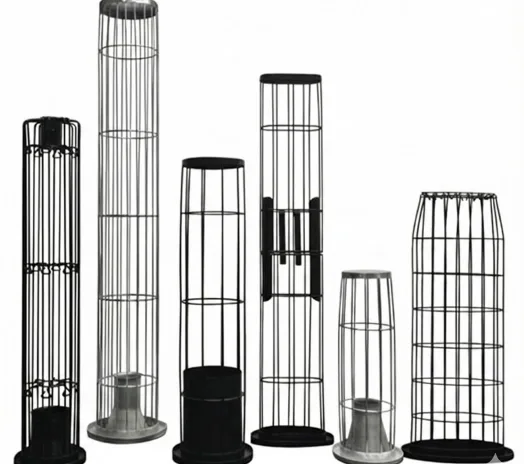
The cage supports the filter bag during filtration and pulse cleaning. In a pulse-jet baghouse, the cage keeps the bag open and prevents collapse while dust cake forms on the outside of the bag. EPA also describes wire-mesh cages as internal supports used inside bags in pulse-jet fabric filters.
If the cage is too large, it can stretch the bag and damage the media. If it is too small, the bag may fold, slap, or move too much during pulse cleaning. If the cage is bent, rough, rusty, or misaligned, it can cause internal abrasion or punctures.
Omela’s filter bag cage product information emphasizes that cage material, corrosion and heat resistance, wire diameter, cage diameter, cage length, ring spacing, surface treatment, venturi fit, and filter bag compatibility all affect baghouse performance.
A replacement bag and cage should be treated as one matched assembly. A good bag installed on a bad cage may still fail early.
Installation Damage: Small Marks Can Become Large Leaks
Some dust leaks begin before the baghouse is restarted. During installation, bags can be damaged by rough handling, sharp cage ends, burrs, broken welds, dirty tubesheet holes, or dragging across metal edges.
This is especially important for fiberglass, PTFE membrane, aramid, P84, PPS, and other higher-value media. A small scratch on a membrane or a small puncture near the collar may not be obvious at first, but it can become a dust path under airflow and pulse cleaning.
Omela’s installation guidance explains that cages should be lowered straight into the bag and should not snag, puncture, stretch, or compress the fabric. It also notes that the venturi should sit flat and centered in the tubesheet opening.
The practical rule is simple: do not force the cage into the bag. If installation feels difficult, stop and check bag size, cage diameter, cage straightness, and top seating.
Pre-Startup Inspection Checklist
Before the baghouse returns to normal operation, a short inspection can prevent repeat leakage.
- Check every snap band: confirm it is fully seated, evenly expanded, and not twisted or partly raised.
- Inspect tubesheet holes: look for corrosion, ovality, pitting, sharp edges, dust buildup, or worn sealing areas.
- Check cage condition: confirm cages are straight, smooth, correctly sized, and free of rust, burrs, or broken welds.
- Confirm venturi alignment: make sure the venturi or cage top sits flat and centered.
- Inspect gaskets and doors: check access doors, clean-air plenum covers, compartment seals, and flanges.
- Look for installation damage: check for scratches, punctures, folds, stretched fabric, and pinhole risks.
- Run leak testing when needed: use fluorescent tracer powder before full-load operation when emissions are critical.
Omela’s maintenance guide states that fluorescent powder leak testing after bag replacement is one of the most reliable ways to verify system sealing integrity and catch leak paths that visual inspection can miss.
Fluorescent Leak Testing: Confirming the Baghouse Is Really Sealed
Visual inspection can find obvious problems, but it often misses small bypass paths. Fluorescent powder leak testing gives maintenance teams a clearer way to locate hidden leaks.
The process is straightforward:
- Introduce fluorescent tracer powder into the dirty-air side of the baghouse under controlled airflow.
- Allow the powder to move through the system and reach any leak paths.
- Stop the system safely after the test cycle.
- Inspect the clean-air plenum with UV light.
- Identify bright powder marks around collars, tubesheet holes, damaged bags, or structural bypass points.
- Repair the leak source and retest if necessary.
Omela’s fluorescent powder leak testing article describes a field service process where green tracer powder was introduced into the dirty-air side, and the clean-air plenum was inspected with UV lamps to identify leakage paths after installation. Omela also offers fluorescent tracer powder for baghouse leak testing, emission troubleshooting, broken-bag detection, and airflow pattern analysis.
For plants with strict emission limits, leak testing should not be seen as optional. It is often the most direct way to confirm whether the new installation is actually sealed.
Field Lessons
| Source / Field Reference | What It Shows | Practical Lesson |
| Omela installation guidance | Bag replacement reliability depends on tubesheet condition, snap band seating, cage insertion, venturi alignment, and leak testing. | A successful bag changeout is not complete until fit and sealing are verified. |
| Omela fluorescent powder field service | Tracer powder and UV inspection can reveal hidden leak paths after installation. | Leak testing can find problems that visual checks may miss. |
| Omela measurement guidance | A worn or oval tubesheet hole may leak even when snap band size looks correct on paper. | Measurement should include both the bag and the baghouse interface. |
| EPA fabric filter monitoring guidance | Bag leak detection systems can monitor bag breakage and leakage. | Leak control should be verified and monitored, not guessed. |
| Omela maintenance guidance | Leak testing after bag replacement helps verify sealing integrity. | Post-installation testing reduces the risk of repeat leakage. |
These references support one practical conclusion: dust leakage after filter bag replacement is usually a system sealing issue, not only a filter bag issue.
A Practical Troubleshooting Sequence
When dust appears after filter bag replacement, start with the most likely and easiest-to-check items first.
First, identify when the dust appears. Continuous leakage may point to snap band bypass, tubesheet leakage, gasket leakage, structural bypass, or broken bags. Leakage mainly after pulse cleaning may suggest pinholes, loose collars, damaged bags, or cage-related wear.
Next, inspect the clean-air plenum. Dust rings around collars usually suggest top sealing problems. Dust trails from certain rows may suggest installation patterns, cage issues, or compartment airflow problems. Bright marks under UV light may show fluorescent tracer powder at specific leak points.
Then inspect the snap band and tubesheet interface. The snap band should sit evenly in the groove. The tubesheet should be round, clean, smooth, and free of corrosion or sharp edges.
After that, review cage condition. The cage should be straight, smooth, and correctly sized. It should not scrape, stretch, or puncture the bag during installation.
Finally, check structural bypass. Door gaskets, clean-air plenum seals, welds, hopper flanges, and compartment joints can all leak even when every filter bag is correctly installed.
How Omela Products Help Reduce Leak Risk
Omela supports dust leak prevention by matching the filter bag, cage, tubesheet requirements, surface treatment, and leak testing method.
For filter bags, Omela can supply polyester, acrylic, PPS, aramid/Nomex, P84, PTFE, fiberglass, FMS, PTFE membrane, anti-static, water/oil repellent, and customized top and bottom constructions depending on dust and process conditions.
For cages, Omela can help review cage diameter, length, wire count, ring spacing, venturi type, joint design, coating, corrosion condition, and cage-to-bag fit. This matters because a rough or wrong-size cage can damage a new bag even when the bag material is correct.
For leak testing, Omela’s fluorescent tracer powder helps verify whether the new installation is sealed before the plant returns to full operation. This makes it easier to separate bag damage, snap band bypass, tubesheet leakage, cage issues, and structural leaks.
Common Mistakes to Avoid
The first mistake is assuming every leak after replacement is a bag defect. Many leaks come from poor seating, worn tubesheet holes, cage damage, or structural bypass.
The second mistake is skipping tubesheet inspection while the old bags are removed. Once new bags are installed, many tubesheet problems become harder to see.
The third mistake is reusing cages without checking straightness, rust, burrs, broken welds, diameter, length, and venturi condition.
The fourth mistake is forcing cages into bags. This can create hidden punctures or scratches that only show up after startup.
The fifth mistake is relying only on visual inspection. Small bypass paths may not be visible without fluorescent leak testing or proper monitoring.
To Request a Quote
For filter bag replacement or dust leak troubleshooting, please send:
- Baghouse type and application
- Dust type, temperature, moisture, and gas chemistry
- Current filter bag material, diameter, length, top style, and bottom design
- Snap band type, flange type, or collar structure
- Tubesheet hole diameter and photos of the tubesheet
- Cage diameter, length, wire count, ring spacing, material, and coating
- Venturi type and top connection details
- Current problem: outlet dust, clean-air plenum dust, high opacity, visible leak marks, or failed leak test
- Photos of used bags, clean-air side dust pattern, cages, tubesheet holes, and damaged areas
- Quantity and delivery destination
With this information, Omela can help check whether the problem is related to bag size, snap band seating, tubesheet fit, cage alignment, media selection, or structural bypass.
Omela Engineering View
Dust leakage after filter bag replacement should not be treated as a simple product complaint. It is usually a system fit and sealing problem.
A new filter bag can still leak if the snap band is not seated, the tubesheet hole is worn, the cage is bent, the cage diameter is wrong, the venturi is tilted, the gasket is degraded, or the bag was damaged during installation. The correct response is to inspect the complete sealing path.
For Omela, a reliable replacement solution means matching the filter bag and cage, checking the tubesheet interface, choosing the correct top design, confirming operating conditions, and verifying the system with leak testing where needed.
The goal is not only to install new bags. The goal is to make sure dusty air has only one path: through the filter media.
FAQ
Why does dust leak after new filter bags are installed?
Dust may leak after new filter bags are installed because of poor snap band seating, worn tubesheet holes, wrong cage fit, installation damage, gasket leakage, structural bypass, or unverified sealing.
How do I know if a snap band filter bag is seated correctly?
A snap band filter bag should expand fully into the tubesheet groove, sit evenly around the hole, and not appear twisted, tilted, or partly raised. Clean-air side inspection and fluorescent powder testing can help confirm seating.
Can tubesheet holes cause dust leaks?
Yes. Worn, corroded, oversized, oval, pitted, or deformed tubesheet holes can prevent the snap band or collar from sealing correctly, allowing dust to bypass the filter bag.
How does cage fit affect dust leakage?
A wrong-size or damaged cage can stretch, fold, rub, puncture, or misalign the filter bag. Poor cage fit can also affect pulse cleaning, bag movement, and long-term sealing stability.
What is fluorescent powder leak testing?
Fluorescent powder leak testing uses tracer powder introduced into the dirty-air side of the baghouse. After airflow distribution, the clean-air side is inspected with UV light to locate leaks around collars, tubesheet holes, bag damage, or structural bypass paths.
Should leak testing be done after every filter bag replacement?
Leak testing is strongly recommended after full bag replacement, major maintenance, tubesheet repair, repeated emission problems, or when the plant needs to verify sealing integrity before returning the baghouse to service.
What information is needed to troubleshoot dust leaks after bag replacement?
Provide bag size, top style, snap band or collar details, tubesheet hole diameter, cage size and condition, dust type, operating temperature, leak location, clean-air plenum photos, failed bag photos, and any fluorescent leak test results.
Author

Jessica Ma – Senior Filtration Engineer, Omela Filtration
Jessica Ma is a senior filtration engineer at Omela Filtration, specializing in dust and liquid filtration. With over 15 years of experience, she focuses on optimizing baghouse performance, enhancing filtration efficiency, and developing high-performance solutions for industrial dust collectors and precision liquid filtration applications.