
Key Takeaways
- Modular does not mean installation-free. A pulse jet baghouse dust collector can arrive in preassembled sections, but foundations, lifting, sealing, electrical work and performance checks remain project-critical.
- Agree on the shipping split during engineering. Module dimensions, center of gravity, lifting points, flange locations and maintenance clearances should be settled before fabrication, not after the trucks arrive.
- Protect the parts that determine filtration integrity. Tube sheets, pulse headers, doors, sealing surfaces and filter bag cages deserve special handling throughout transport and installation.
- Commission the assembled system, not just the individual modules. Airflow, pressure drop, dust discharge and the integrity of industrial dust filter bags must be checked against the approved design.
- Use measurements to verify readiness. The site’s operating envelope and baghouse design calculations matter more than generic claims about how quickly a modular collector can be installed.
Why Large Baghouses Are Shipped in Modules
A large pulse jet baghouse is not simply a steel box filled with filter bags. It is a coordinated assembly of dirty-air compartments, tube sheets, clean-air plenums, hoppers, pulse-cleaning equipment, discharge devices, support steel, platforms, ducts, fans and controls. A factory can assemble some of these items together, but road or sea transport may make a fully assembled collector impractical.
Modular construction divides the equipment into transportable sections designed to reconnect at the site. It can move complicated fabrication work into the controlled conditions of a workshop and reduce the amount of field welding. However, the commercial advantage depends on the actual route, crane access, installation tolerances and outage window. A poorly chosen module split can create more field work than it saves.
The central engineering question is therefore not “How many modules can we ship?” It is “Which joints should be completed in the factory, and which can be assembled safely and accurately on site?” That decision should involve design, fabrication, logistics and installation teams before production begins.
Factory Preassembly: What Should Be Completed Before Shipment?
Housing, Tube Sheets and Mechanical Interfaces
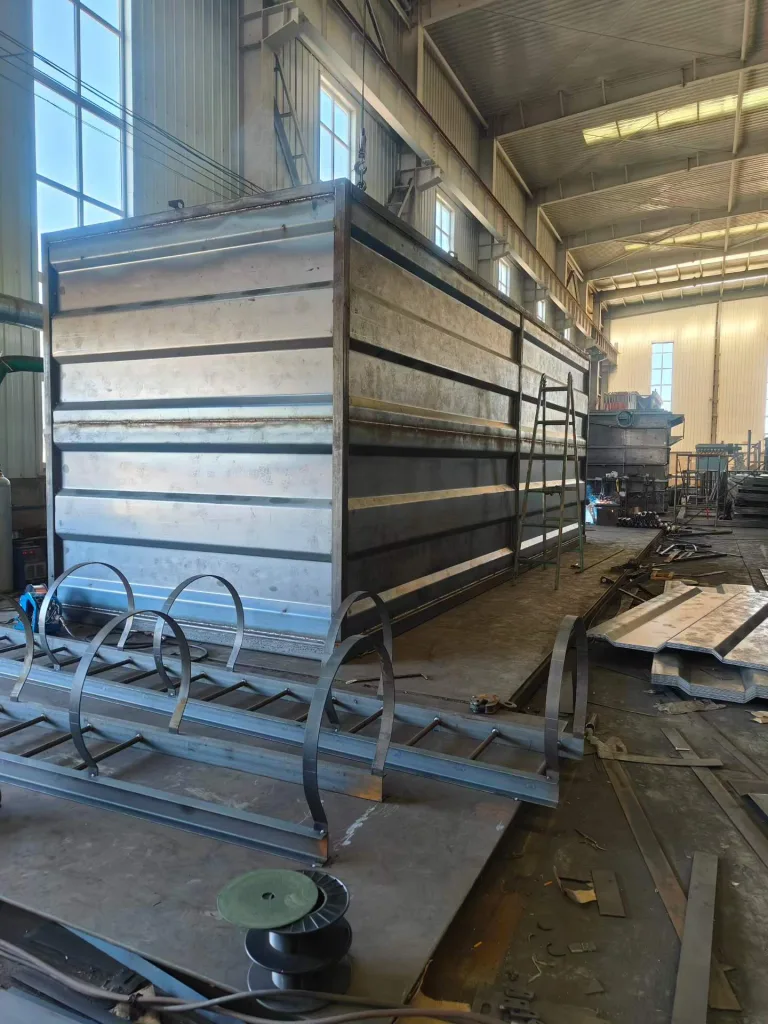
Factory preassembly commonly includes housing panels, stiffeners, hoppers, clean-air sections, predrilled connection flanges and selected access doors. Where practical, critical tube-sheet joints and internal partitions can be completed and inspected before shipping. Each module must remain rigid enough for both transportation and handling, which may impose loads different from normal operating pressure.
Confirm that flange faces are aligned, mating joints are accessible, and bolt holes correspond to the assembly drawings. Check critical dimensions diagonally as well as horizontally and vertically. A rectangular housing can meet its overall length specification while still being out of square enough to complicate field assembly.
Pulse Cleaning, Service Platforms and Accessories
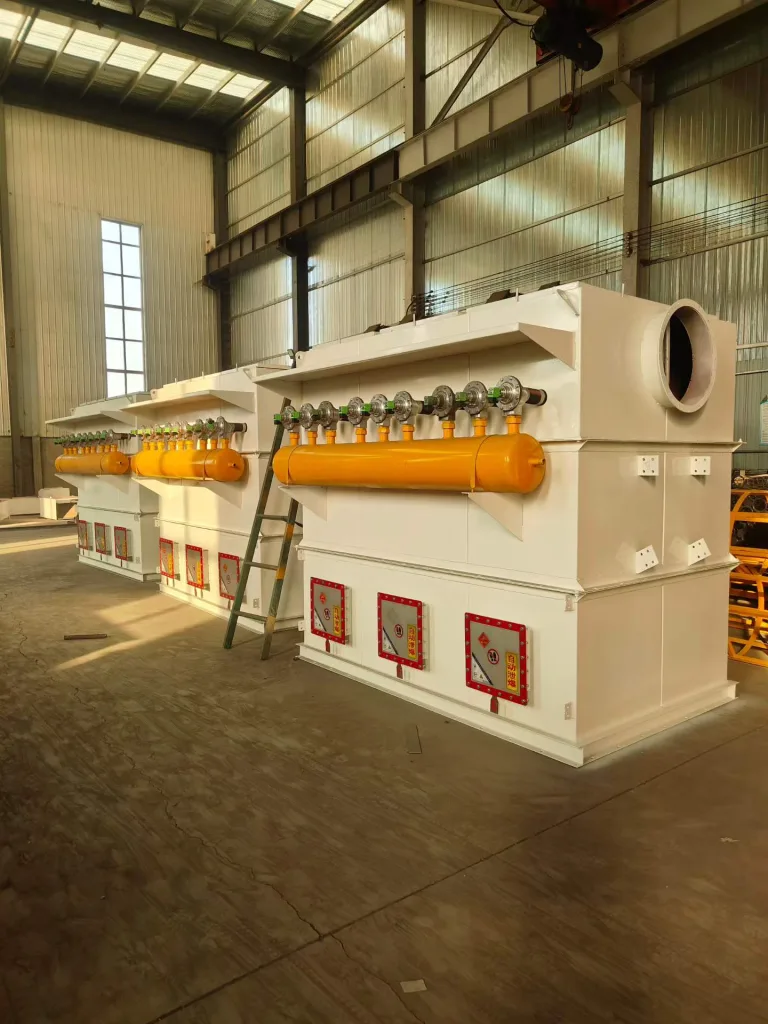
Compressed-air headers, pulse valves, blowpipes and instrument brackets may be installed in the workshop when they can travel without damage. More exposed items, including gauges, electrical instruments or projecting pipes, may need separate protective crates. Maintenance platforms and handrails can be trial-fitted and marked for later assembly.
Factory footage of large baghouse sections, yellow compressed-air headers, platform steel and boxed accessories is useful for showing what preassembly looks like. Such footage demonstrates the physical package, not proof that an operating test or emissions test has been completed. A shipment inspection record is needed to make those claims.
Every detachable part should carry a durable identification mark matching the packing list and erection drawings. A missing orientation mark on a large duct or support member can cause field rework.
| Component | Factory preparation | Site verification |
|---|---|---|
| Housing and tube sheet | Inspect geometry, welds and mating flanges | Confirm alignment and clean-air separation |
| Pulse-air equipment | Trial-fit headers, valves and supports | Check connections, nozzle alignment and controls |
| Platforms and handrails | Trial-fit and label detachable pieces | Verify fixings, access and fall protection |
| Ducts and accessories | Match module IDs to the packing list | Confirm orientation and complete connections |
Choose the Module Split Around Transport and Reassembly
Shipping Envelope and Route Constraints
A transport drawing should show the actual loaded length, width and height of each module, not merely its nominal fabrication dimensions. Include the supporting skid, trailer deck allowance, tie-down projections and lifting attachments. Weight and the estimated center of gravity are equally important for vehicle selection and unloading plans.
Transport limitations vary by country, road, border crossing, bridge, port, and season. Confirm permitted dimensions, route surveys and any required escort or special movement approvals with the responsible freight and transport specialists. There is no universal maximum baghouse module size suitable for every export destination.
The apparently cheapest split is not always the lowest-cost one. A very large housing section might reduce field bolting but require an expensive heavy-haul route and crane. Smaller sections fit conventional freight more easily but add flange connections, sealing work, labor and opportunities for misalignment. Compare the total installed cost, rather than the shipping quotation alone.
Protect Sealing and Precision Components
A short pre-dispatch inspection helps protect the interfaces that must remain sound after transport:
- Close and cover openings: Prevent rain, road dust and debris entering the housing or clean-air plenum.
- Protect mating surfaces: Shield flange faces, tube sheets, gaskets and prepared joints from damage.
- Secure sensitive parts: Crate vulnerable instruments and pulse components when exposed to impact.
- Restrain the load correctly: Use engineered supports and tie-down points, never fragile doors or air headers.
- Record the condition: Photograph each identified module, its protection and the final secured load.
Do not leave unsecured heavy accessories inside a housing. For overseas deliveries, specify suitable moisture protection; timber packaging must meet destination import requirements. Keep module IDs, gross weights and lifting instructions readable after wrapping.
Lifting and Unloading: Plan Before the Crane Arrives
The lifting plan must come from qualified site and lifting professionals using verified module weights, centers of gravity, crane charts and the intended rigging arrangement. Each permitted lifting point must be identified in approved drawings. A transport tie-down lug is not automatically a lifting lug.
Before unloading, check ground bearing capacity, crane outrigger locations, access routes, overhead obstructions, power lines, wind conditions and the final set-down area. Long, wide or eccentric housing sections may need a spreader beam or specially engineered rigging to prevent distortion. The erection method must also consider temporary stability before the next module or brace is connected.
Never allow personnel to work beneath suspended loads. Establish exclusion zones and communication procedures, and use qualified riggers and operators as required by the applicable jurisdiction. If the delivered module is heavier, has a different center of gravity, or has damaged lift points compared with the approved documents, stop and revise the plan instead of improvising.
Inspect each delivery immediately for dented panels, distorted flange corners, cracked paint, broken bracing and missing accessories. Document any discrepancy before unloading or beginning field repairs. Damage to the clean-air boundary is not merely cosmetic: it can eventually create dust bypass or air leakage.
Site Assembly: Build a Sealed and Serviceable System
Foundations, Supports and Module Alignment
Verify foundation dimensions, anchor locations, level and structural readiness before the first lift. Install the support structure and temporary bracing in the engineered sequence. Depending on the design, assembly may proceed from the hopper and supporting frame upward, or by setting a larger preassembled housing into position. Neither sequence is universal.
Set modules using reference datums rather than aligning solely by their exterior cladding. Check clearances for filter removal, hopper discharge maintenance, compressed-air components and access doors. A collector that fits physically but leaves no safe room to remove its filter cages is not properly integrated.
Flanges, Gaskets, Welds and Dust-Tight Separation
Clean and inspect mating surfaces before fitting the specified gasket or sealant. Tighten bolts using the approved sequence and torque requirements; do not assume that extra sealant can correct a twisted or badly misaligned flange. Where field welding is required, follow the approved welding procedure, inspect the joint and restore the protective coating.
Pay particular attention to separation between dirty-air and clean-air spaces. In a baghouse, leakage around a tube sheet, filter seating arrangement or internal partition can allow unfiltered dust to bypass the media. Exterior air leakage can also change fan duty and system pressure. Both deserve verification before startup.
After structural assembly, install or inspect air headers, pulse lines, dust-discharge equipment, fan connections, duct supports, platforms and electrical controls. Confirm that the hopper is not carrying unintended duct or equipment loads. Verify expansion joints and flexible connectors where the design requires them.
Pre-Commissioning: Check the Whole System
Mechanical completion is not the same as performance acceptance. Before introducing process dust, perform a documented walkdown and verify the following against approved drawings and the equipment manufacturer’s instructions.
| Inspection area | Pre-start verification |
|---|---|
| Structure and safety | Anchors, braces, guards, access doors and removal of temporary transport items |
| Filter integrity | Seated filter bags, undamaged cages, tube-sheet seals and clean-air compartment condition |
| Pulse and discharge systems | Clean, dry compressed air; correct valve sequencing; functioning hopper discharge |
| Fan and controls | Motor rotation, fan permissives, pressure-sensing lines, alarms and interlocks |
| Operating baseline | Airflow, filter differential pressure, fan current, pulse activity and leakage observations |
Use OEM-specific pulse pressure and control settings rather than copying values from another installation. Introduce airflow and process dust only through an approved startup procedure. Leak-detection and emissions testing depend on the project specification and applicable permits; installed filter bags alone do not establish compliance.
The handover record should link module IDs to inspection results, installation photographs, spare parts and as-built drawings so future maintenance teams can trace the installation.
What Published Industrial Installations Teach Us
Public contractor case reports offer practical examples of project sequencing and installation risk. They are third-party published accounts, not Omela project results, and their dimensions or schedules should never be treated as standard guarantees.
Foundry Dust Collector: Sequence Matters More Than Module Count
One published foundry installation documented a 100,000 CFM dust collector. The project description reported engineering six months in advance, fabrication four months ahead of installation, a three-person site-preparation crew one week beforehand, and a six-person installation team. Assembly proceeded upward from the hopper, using custom structural steel and a preassembled catwalk and walk-in access section. The reported finished assembly stood about 65 ft tall, with a 90-ft stack and more than 1,000 filters.
The transferable lesson is that fabrication milestones, site preparation and access components should be coordinated as one erection sequence. The report describes an individual project, not a benchmark for installation duration or crew size.
Constrained Rooftop Replacement: Lift Clearance Can Control the Project
A published carbon-black plant replacement involved an existing rooftop baghouse suffering repeated maintenance problems. The contractor reported completing engineering, manufacture, transport and installation within 14 weeks after purchase order acceptance, including a five-day demolition-and-installation window. A 500-ton crane removed the old unit, and the replacement module reportedly had only about 3 inches of clearance on each side during placement.
This example illustrates why physical envelope checks and a formally engineered lift route are essential for retrofit work. Modular construction did not eliminate heavy-lift complexity; it made coordination between factory dimensions, crane planning and the available outage especially important.
Lead-Oxide Processing: Modular Design Can Support Maintenance Access
A third published project described replacing dust collection equipment at a lead-oxide battery manufacturing facility. Its reported configuration comprised two 16,500 CFM modules, each containing 240 filter bags, with two fans arranged to permit maintenance on one side while the other remained online. The project also incorporated an enclosed walk-in clean-air section and monitoring equipment.
The lesson is that modularity can serve operational isolation and safe maintenance access, not just transport. However, the report does not establish that every two-module baghouse can remain fully productive during maintenance; that depends on isolation arrangements and remaining system capacity.
Common Planning Mistakes and a Better Handover Checklist
Projects often lose their expected modular-installation advantage at the interfaces between teams. Common errors include selecting shipping sections without confirming the crane route, omitting centers of gravity from transport documents, protecting painted surfaces but leaving flange faces exposed, and shipping platforms without clearly labeled brackets and fasteners.
Other avoidable problems arise when installation crews discover missing gaskets, conflicting foundation dimensions, inadequate removal clearance for filter bags, or incomplete control-system wiring information. Each issue may seem small compared with the size of the collector, but a single missing interface item can delay an entire installation sequence.
Before dispatch, confirm the approved general arrangement, module drawings, weight and center-of-gravity schedule, lift-point details, packing list, accessory identification, applicable inspections, and scope of field welding or bolting. Before commissioning, confirm completed mechanical inspections, cleaned compartments, connected pulse system, fan checks, operational interlocks and a baseline measurement plan.
Final Engineering Recommendation
A modular pulse jet baghouse is successful when it arrives in installable sections, can be lifted without improvisation, joins without hidden leakage paths and achieves its designed operating conditions after assembly. These results require decisions made well before dispatch: where the modules divide, how they are supported in transport, which parts need separate protection and what the site team must verify.
For a new project or retrofit, provide the required gas flow, temperature, dust properties, emission target, site layout, transport restrictions, installation elevation and available shutdown window. Those inputs allow the equipment package and installation strategy to be engineered together rather than negotiated separately after fabrication.
FAQ
Is a Modular Pulse Jet Baghouse Fully Assembled When Delivered?
Not necessarily. Housings and accessories may be preassembled, but large systems often require site bolting or welding, lifting, duct and fan connections, wiring, sealing and commissioning. The exact factory-to-site split must be shown on the approved drawings.
What Should Be Checked Before Shipping a Baghouse Module?
Verify dimensions, weight, center of gravity, lifting points, flange alignment, component labels, protected openings, transport restraints and the packing list. Record inspection findings and photos before dispatch.
Can a Baghouse Be Lifted Using Its Transport Tie-Down Points?
Not unless those points are explicitly engineered and approved for lifting. Use the manufacturer-designated lifting arrangement and a qualified lift plan that considers load weight, center of gravity and site conditions.
Which Baghouse Joints Are Most Important During Site Assembly?
Clean-air and dirty-air separation, tube-sheet seals, housing flanges, duct connections, access doors and hopper interfaces all require careful inspection. Improper sealing can cause dust bypass, air leakage or unstable system performance.
What Tests Are Needed Before Starting a Newly Installed Baghouse?
Complete mechanical and electrical checks, verify fan rotation and controls, confirm pulse-air and dust-discharge operation, then measure airflow and differential pressure under an approved startup procedure. Additional leak or emissions tests depend on the project specification and permits.
Author

Jessica Ma – Senior Filtration Engineer, Omela Filtration
Jessica Ma is a senior filtration engineer at Omela Filtration, specializing in dust and liquid filtration. With over 15 years of experience, she focuses on optimizing baghouse performance, enhancing filtration efficiency, and developing high-performance solutions for industrial dust collectors and precision liquid filtration applications.