Getting baghouse filter bag dimensions right is not “nice to have.” It affects seal integrity, pulse cleaning efficiency, bag wear, and emissions stability. A bag that’s even slightly off can leak at the tube sheet, rub on the cage, or blind early—then you end up chasing high ΔP and premature failures.
At Omela Filtrations, we see the same root cause again and again in replacement projects: bags ordered from assumptions instead of measured data. Below is the measurement method we recommend to customers in cement, aggregates, mining, carbon black, power, WTE, metallurgy, and other demanding dust applications.
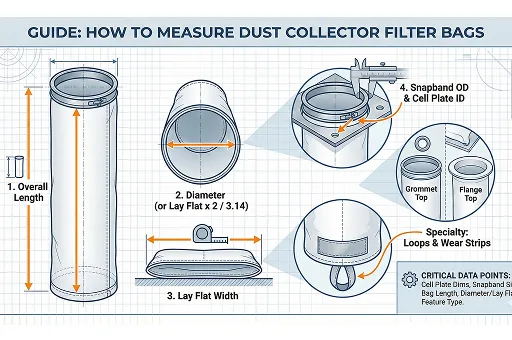
What you must measure (the “no-miss” checklist)
Use the same measurement method every time. For baghouse replacements, these are the critical items:
- Cell plate / tube sheet opening (hole size and thickness if possible)
- Snapband size (must match the cell plate fit)
- Bag length (measured consistently to a defined stitching reference)
- Lay-flat width or bag diameter (and convert correctly)
- Special features (wear strips/cuffs, loops, flange, grommet top, etc.)
Tools you’ll need
- Tape measure (metric or inch—use one system consistently)
- Marker or masking tape (to mark start/end points)
- Straight edge or ruler (helps with flat width)
- Camera/phone (document top construction, bottom style, and special features)
- Optional but recommended: Pi tape for cage circumference/diameter measurement
Step 1: Measure bag diameter correctly (or measure flat width and convert)
Many sites measure flat width because it’s simple: lay the bag flat, smooth it, and measure the width across.
If you have flat width (FW) and need diameter (D):
- D = (FW × 2) / 3.14
If you have diameter and need flat width:
- FW = (D × 3.14) / 2
Omela Filtrations tip: Don’t pull the fabric tight. Flatten it naturally and measure twice—once near the top and once near mid-body—to catch distortion from wear or heat shrink.
Step 2: Measure bag length the way manufacturers expect
Length is where most errors happen—because different teams measure from different points.
For top-load snapband bags, the most repeatable method is:
- Measure end-to-end using a stitching reference at the bottom disc.
- A common standard is measuring from the center of the snapband to the first row of disc-bottom stitching.
Some plants measure from the top end of the bag down to the first row of disc-bottom stitching. That can be acceptable, but you must state the method clearly and keep it consistent.
Why this matters: If one vendor measures to the bottom seam and another measures to a different stitch line, you can be off by 10–20 mm (or more). That is enough to cause poor seating, cage bottom impact, or accelerated abrasion.
Step 3: Measure snapband and tube sheet fit (the seal that prevents leaks)
For snapband top-load bags:
- Measure the cell plate opening (ID) and confirm its condition (burrs, warping, corrosion).
- Record the snapband diameter/size and note whether it is single bead or double bead.
- Confirm the intended fit: snapband must compress evenly and hold without rocking.
Omela Filtrations tip: If the tube sheet hole is worn/oval, a “correct” snapband size on paper may still leak. In that case we recommend reporting the max/min hole dimension and photos, then selecting a snapband design that compensates.
Step 4: Measure special features (don’t skip these)
Special features often determine whether the bag survives abrasive dust, high temperature zones, or frequent pulsing:
- Wear cuff / wear strip: measure length and width, and note the location (top, mid, bottom)
- Loops: number, placement, material
- Flange / grommet top: confirm dimensions and fastening style
- Bottom style: disc bottom, hemmed, raw edge, reinforced, etc.
Omela Filtrations tip: If the plant has dust with high abrasion (silica, clinker dust, mineral fines), we usually recommend a wear solution (cuff/strip) plus a media choice that matches temperature and chemistry (e.g., PPS vs P84 vs PTFE).
Common bag types: how to measure each one
Top Load, Snap Band Filter Bag (felt)
- Flat width: Flatten bag and measure width across.
- Length: Measure along the seam. Start at the center of the snapband and end at the first stitch at the bottom.
- Cage-to-bag fit: Check pinch and clearance so the bag is not stretched tight over the cage bottom.
Omela Filtrations field rule: A bag that’s too tight on the cage wears early at the wires; too loose can fold, slap, and fatigue at seams.
Top Load, Snap Band Filter Bag (woven fiberglass)
The steps are similar, but woven fiberglass behaves differently from felt:
- It has less stretch and can be less forgiving with fit.
- Over-tensioning increases the risk of abrasion and breakage at contact points.
Omela Filtrations tip: For woven fiberglass or fiberglass blends, pay extra attention to cage finish (smooth welds, no sharp burrs) and confirm proper pinch/fit.
Shaker-style filter bag (with tail)
Shaker bags often include a tail and sometimes a wear cuff at the snapband end. Measure:
- Flat width: Flatten and measure width across.
- Length (main body): Measure along the seam from the end of the snapband to the end of the bag, not including the tail.
- Tail length: From end of the bag to end of the tail (along seam).
- Tail flat width: Flatten tail and measure width.
- Tail ply (3-ply or 4-ply): Pinch and feel layers.
- Wear cuff (if present): Measure length and width.
Omela Filtrations tip: Shaker bags are sensitive to dimensional errors because shaking motion amplifies fabric fatigue. If your shaker bags fail at the cuff or tail, we look at (1) fit, (2) cage finish, and (3) abrasion zones inside the compartment.
Measuring cages: what to record (so the bag fits and lasts)
A replacement bag can only perform well if the cage is correct—and in good condition.
Step-by-step cage measurements
- Full length: top to bottom.
- Diameter: measure at the widest point between wires (Pi tape preferred for circumference-based accuracy).
- Bottom construction: crimped cup vs welded wires to cup.
- Number of rings: count them.
- Ring spacing: measure spacing; note if the last spacing differs near the bottom cup.
- Vertical wires: count number of vertical wires.
- Material: plain steel, galvanized, coated, 304 stainless, etc.
- Top construction: split top dimensions OR venturi length, if present.
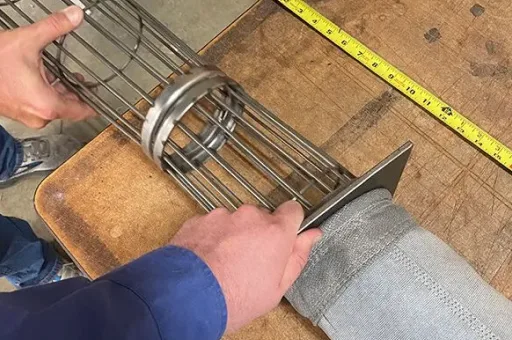
Omela Filtrations tip: If you see heavy corrosion, broken welds, or sharp wire ends, replace cages together with bags. Otherwise you’ll destroy new bags quickly and blame the media.
Quick reference table: what to send Omela Filtrations for a correct quote
| Item | What to provide | Why it matters |
|---|---|---|
| Bag type | Top-load snapband / shaker / other | Defines length reference and top construction |
| Tube sheet / cell plate | Hole ID + thickness + photos | Controls snapband seal and leak risk |
| Diameter or flat width | One measurement + method used | Prevents mismatch and rubbing |
| Bag length | Start/end reference points + measured length | Prevents bottom impact and tension failures |
| Special features | Wear cuff/strip, loops, flange, grommet top | Drives durability in abrasion/heat zones |
| Cage details | Length, diameter, rings, wires, top style, material | Correct fit + reduces abrasion points |
Troubleshooting: measurement mistakes that cause early failures
“We installed new bags and ΔP jumped fast”
Most common causes:
- Flat width measured incorrectly (bag actually smaller than expected)
- Dust is embedding because the media isn’t surface-filtering enough
- Pulse settings too aggressive for the media type
“We see dust leaks right after installation”
Most common causes:
- Snapband size or bead style doesn’t match the tube sheet
- Tube sheet holes are worn/oval and not sealing
- Installation method damaged the snapband area
“Bags wear through at the same height”
Most common causes:
- Cage rings or vertical wires are rough/sharp at that zone
- Bag is too tight on cage (constant rubbing)
- Abrasion zone needs wear strips/cuffs and/or different media
Omela Filtrations recommendations by application (fast guidance)
- High-abrasion silica/mineral dust (stone crusher, mining, cement mill): PPS or P84 blends + wear protection; consider PTFE membrane for surface filtration
- High temperature + aggressive chemistry (WTE, metallurgical off-gas): P84 or PTFE; verify acid dew point risk
- High humidity / condensation risk: avoid hydrolysis-prone media; use chemical-resistant solutions and ensure dew point control
If you tell us your gas temperature, dust type, and cleaning method, Omela Filtrations can recommend the right bag construction and measurement method for your system.
Next Steps: What to Send for a Correct Fit
If you want a replacement that fits the first time, send Omela Filtrations:
- Photos of the bag top/bottom + tube sheet hole
- Flat width or diameter + your method
- Bag length + your reference point
- Cage measurements (or cage photos + key dimensions)
Contact Omela Filtrations today for a measurement check, filtration audit, and a quotation engineered for your dust conditions.
Author
Jessica Ma – Senior Filtration Engineer, Omela Filtration
Jessica Ma is a senior filtration engineer at Omela Filtration, specializing in dust and liquid filtration. With over 15 years of experience, she focuses on optimizing baghouse performance, enhancing filtration efficiency, and developing high-performance solutions for industrial dust collectors and precision liquid filtration applications.